Experiments with Colorhue Dyes

I am absolutely in love with the Colorhue brand of dyes for protein fibers.  What’s not to love about instant set dyes (no heat or time required) at affordable prices?  Since I am going to be doing a tutorial later this month on how to dye scarves with this method and a full product review for another site, I’ll just show you some of the results I’ve gotten with this product. I’m utterly addicted!

Colorhue Dyes diluted and ready to use
Ready to use

The dyes come in a very concentrated form, sorry I haven’t taken a picture of them in their packaging.  While the instructions say to use just a few drops per half cup of water, I found that to be very pale. I use one eyedropper of concentrate per ounce of distilled water. The first few I did used less than that, so you’ll see that some are more pastel. (Squirt bottles are not required, it depends on what sort of dye techniques you will be using, so far I have been doing what is known as “bread bag” dyeing, a low-water technique.)

Plain white silk scarves ready to dye
Dharma Trading sells wonderful white silk scarves ready to dye

Once you’ve mixed the solution (and there are no toxicity issues here!)  you need something to dye.  I had ordered a large batch of scarves from DharmaTrading.com — they have fantastic prices and a wide assortment of sizes.  You can also buy the Colorhue Dye from them directly, although I had bought mine from a vendor at SAFF. I also bought a pillowcase because I often have flareups of dermatitis on my face and having a silk pillowcase is very soothing. Plus I did one experiment with some wool. I’ve since bought a lot more wool to dye but that will have to wait until after my move, alas. So first I started with some silk chiffon scarves that I bought at SAFF when I bought the dyes. These are very sheer so it is hard to see the true colors in the photos.  Also this was when I was using one dropper of dye to two ounces of water, so the colors are less intense. Handdyed scarf Handdyed Chiffon Scarf Handdyed Chiffon Scarf Two handdyed chiffon scarves
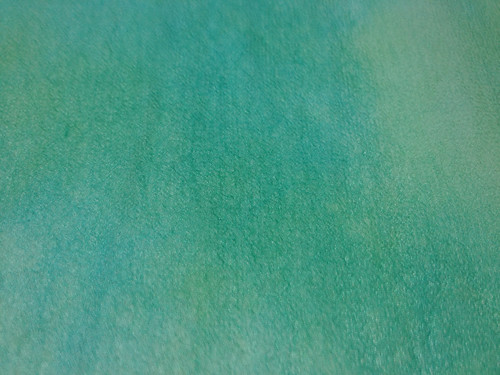
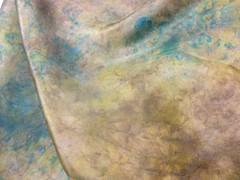
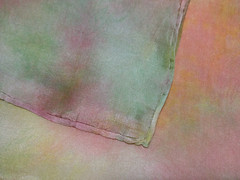
Because these scarves were chiffon it was very hard to photograph them properly and it is hard to see the color distinctions. I have learned a bit more on how to make the variations in color and tone more obvious with more concentrated dyes and different base fabrics, but you’ll just have to trust me when I say these are a lot prettier in real life. Here’s the first batch all together:

Batch of handdyed chiffon scarves
I was going for a floral-inspired palette with these scarves

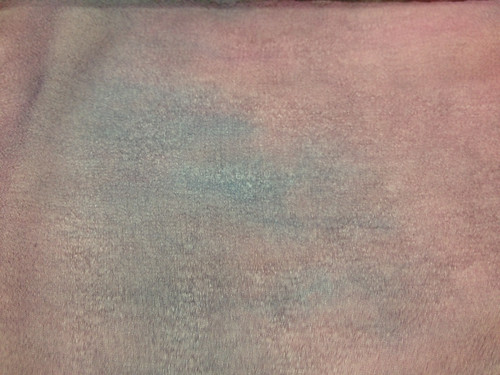
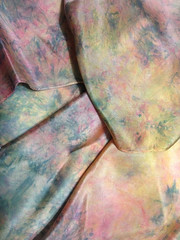
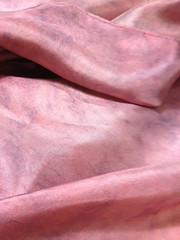
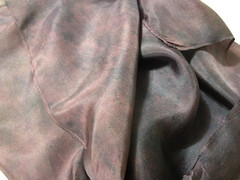
This image shows a bit more of the intensity, plus it’s a little easier to see the mottled shading. I dyed all of these twice as the colors were just too pale the first time so I kept layering more dye on them. This is why I doubled the concentration of my dyes the next time I mixed a batch. After these scarves I moved on to the pillow case: Handdyed silk pillowcase 
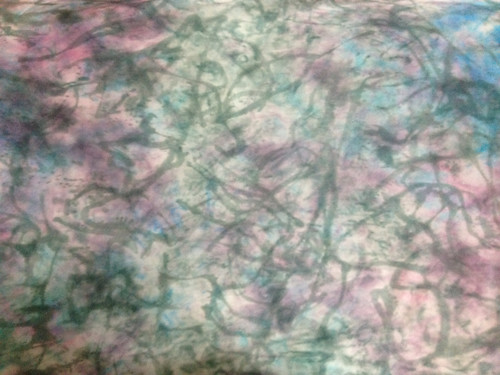
Again I had to keep going back and adding more dye, I still think the colors are far more pastel than I’d like (it really doesn’t match any of my bedding). In a final act of frustration I wrung out most of the water and them drizzled the black over the top. I love the effect the black had but I’m still debating redyeing the colored bits to be more intense. Or maybe just doing another pillowcase 🙂 At the same time I tried a bit of wool, like the kind used for applique and rug hooking.  Again the colors were very pastel, due to the diluted dye mixture. I do sometimes need pastel so I will probably not redye this one, but will definitely use more concentrated solution in the future. Handdyed wool 
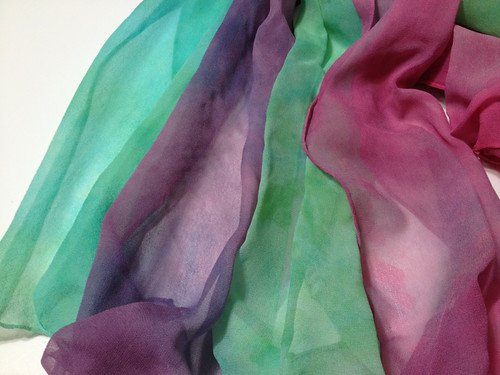
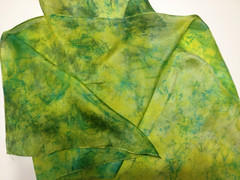
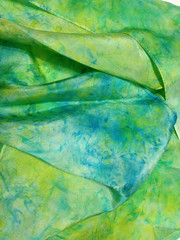
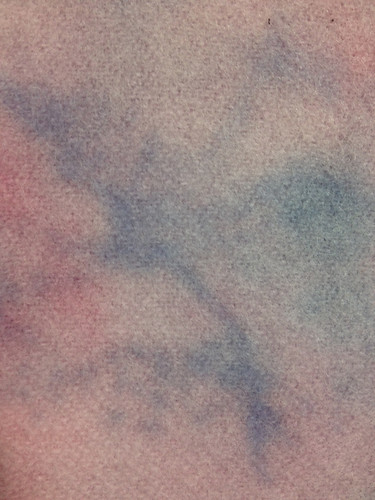
I did a few scarves in the habotai silk, but wound up redyeing most of them (as I will show you later). By this point I was fed up with the pastel shades and doubled the amount of dye in my mixtures.  From this point I become a MUCH happier camper.  Here are a slew of examples:

Handdyed silk habotai scarf Handdyed silk habotai scarf Handdyed silk habotai scarf Handdyed silk habotai scarfHanddyed silk habotai scarf Handdyed silk habotai scarf Handdyed silk habotai scarf Handdyed Habotai silk scarf

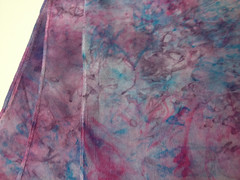
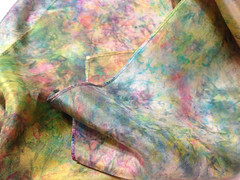
Unfortunately I still don’t have a light tent so not all of these photos are true to color. However I think they give you a decent idea of the range of palettes you can achieve with the basic Colorhue starter set. Remember how I said I’d re-dyed a few of the too-pale ones?  Here they are, for comparison:

Handdyed silk habotai scarf (I didn't like) became: Handdyed silk habotai scarf

Handdyed Habotai Silk Scarf -- too light Re-dyed habotai silk scarf for my mother

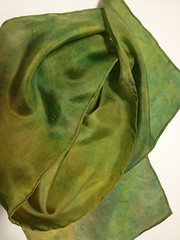
This one (first, pink) was OK, but didn’t go with my mother’s wardrobe, so I went to a more plum shade (second photo). The image doesn’t really do that one justice, the shinyess of the silk makes it look lighter than it really is.

So — these are my experiments so far. I can honestly say I am hooked.  I’ve already got more wool and will be ordering more scarves as soon as payday comes around. Although I have no intention of selling crafts for personal profits (most of these have been given away already or are waiting to be given away), I am wondering if this might not be a good way to raise funds for my charity.  If I *did* sell these scarves, what do you think would be a fair price for them?  I know that handdyed silk usually fetches a decent amount, fair above what the supplies cost, but I’d like to make them affordable yet profitable enough to help the charity.  Suggestions?

Handmade Holiday Recap, Part 1

I’m sure you’re quite ready to be done with the recent holiday season and that every other blogger has long since posted the things they made for Giftmas 2011. Well sorry, I prefer not to post until the gifts have been received so there is no chance of spoilers. (Which is why this is part 1, as some gifts are late and the recipients are still waiting…oops.)

Do you remember the Handmade Pledge that was so popular about two years ago, maybe three? It was a pledge to only give and request handmade items, with a darling little blog badge favored by those who had made the pledge. I never signed up, never will. Not because I don’t give handmade gifts but because I always *want* craft supplies and books about crafting. I also try to give craft supplies to those on my gift list who appreciate them. Unfortunately, while I believe that is still supporting handmade it doesn’t fit the terms of the pledge and it does still mean money is going to large companies that manufacture their items en mass in foreign countries. (Like books, most of which are printed in China.) I did feel like I was a little bit left out because I didn’t get to wave a banner of indie, handmade pride like those who signed the pledge but since that fad fizzled out I guess they couldn’t really stick to those ideals either.

What I do support is giving handmade items as much as I possibly can, but only things I have made myself. Even if it is just a small fraction of the total package someone receives, it is still meaningful. So on that note, I’ll start showing you some of the things I made this year. Unfortunately, I forgot to photograph the things I made for my in-laws prior to leaving Australia. Today, therefore, is what I made for my mother to send to friends and family as part of the gifts she gave. (I don’t generally exchange gifts with the extended family so these were just little tokens, not intended to be stand-alone gifts.)

First, the cards:

A few Christmas cards with an embossed image of a stylized Christmas tree

I know they seem a little plain. It is just a Sizzix embossing folder of a Christmas tree (directly embossed on pre made card blanks). Inside is just a simple stamped greeting. My mother wanted neat and elegant so this was exactly as requested, she really liked them. Alas, even with such basic techniques as embossing and stamping, I still managed to mess up quite a few! I need to remember to never stamp when my blood sugar is low because I often get the shakes. Also I am quite a perfectionist so even if things were off by 2 mm I still counted them as imperfect. Two imperfections and they were out! What you see were the ones I deemed entirely unusable.  Still, a handful wrong and 25 good enough is not a bad average for someone very out of practice at card making, if I do say so myself. 🙂

Next, the potholders:

Red and Green woven cotton potholders

Potholders woven in a variety of bright colors

This is a little embarrassing because as most crafty folks know, kids often start making these around the age of 6. One of my cousins even asked why my mother had returned the potholders she had made her over 40 years ago. *rolls eyes* But again, this was my mom’s request and I made them even though I suspected people would not really appreciate them. These potholders hold up better than any other kind and you can’t buy them in stores, they’re only available handmade. She had originally envisaged sending everyone gifts of soup mix in a jar with potholders and spoons to go with them. She later decided against the jar mix part so the potholders I made for her wound up being rather out of context.

If you are familiar with potholders made of loops (the stretchy cotton loops are usually the leftovers from sock manufacturing), you may notice how very vivid these colors are. That’s because these are not the grab bags you can buy at craft stores but are made with Harrisville Designs’ Potholder Loops. In addition to their very saturated and modern colors these loops are guaranteed to fit the standard potholder looms. No more loops that break or simply don’t fit, no waste.

I came up with a system for making potholders where you only have to weave 1/2 of the weft loops rather than the way I learned where you have to weave all of the weft. I suspect there are more ways to improve since I’ve seen these for sale on Etsy for about $5 each and I can’t imagine anyone taking the 35-45 minutes I spend, plus expenses, and then selling them for only $5. Maybe they have found a way to make at least two an hour? Maybe they don’t have to stop and fast forward through commercials on the DVR? 🙂 At any rate, I’ve been thinking of doing a video or a photo tutorial showing my method to cut down on weaving. (It is not where you use a pencil to hold the warp in one position, but it gives the same results.) Would anyone be interested in seeing that? Don’t want to waste my time if weaving potholders with loops is too 20th century or only for under-10s. 😉

I don’t know how the cards were received but the potholders I think had dubious responses.  I suspect they thought it was too primitive an item, that only children made them and adults only own or use them to indulge the child makers. Heh. I’m not really close to the aunts and cousins my mom gave them to so I don’t feel like asking directly. In the future I think I shall only make potholders for people who appreciate them and/or serious cooks without any children in their lives to make them some. 😉

I’ll be back with parts 2 and 3 of my handmade holidays soon, including dyeing, machine embroidery, needle felting and loom knitting.

Getting ready for the Hollydaze!

Well it is that time of year again where I attempt to make presents for my family for Christmas.  This year I thought well ahead and took yarn from Peaches n Creme (made in Pisgah, North Carolina!) with me on my trip to Sydney, Australia.  So I have had a little while to get cracking on these things.

I had 9 couples on my present list this year, so I decided on one dishcloth/washcloth/hotpad and one Christmas tree shaped ornament.  (Both are crocheted, my passion this year.) Here’s how things came out:

A stack of dishcloths I made for the holidays
This is what 9 dishcloths look like before washing
What dishcloths look like after laundering
After washing the stitches are tighter and the fabric is softer

I used a really basic pattern that I have seen many places and memorized it so long ago I don’t really remember where it came from, sorry.  As I said before the yarn was Peaches n Creme, a perennial dishcloth favourite in the US but one that is rare here in Australia.

And then there were the ornaments!  I made some of these for my mom last year and they were so easy to make that I thought I’d do it again:

12 crocheted tree ornaments
12 ornaments drying after being starched on the ironing board

The green yarn is local Australian: Sullivans Coton-A 5 ply, a cotton-acrylic mix that was very pleasant to work with. The pattern is Grandma Tree by Michelle Kludas/The Royal Sisters (Ravelry page, pattern page) which is designed for larger yarn as a scatter decoration but I’d found that it’s a good size for an ornament (about 3 inches tall) when worked in a fingering weight or close thereto (5 ply).

I can’t decide if I should add a loop of yarn at the top or not. If I don’t they can be used as other sorts of decor if the recipient prefers…so I am leaning toward not. But I’m afraid that without the loop they won’t know what to do with them at all!  Decisions, decisions…. (and not that I have much time as I leave Australia in two days!!)

I have three spare trees if anyone wants to do a trade! 🙂 I always need more ornaments 🙂

Finally, I made some Christmas cards for the inlaws here in Australia.  (I haven’t even started on the ones for people on my list in the US! That will have to wait til my return.)

Inspired by @ChristineUrias on the Scraptime video podcast, I decided to use Pan Pastels and a stamp.  I then tried to tart things up a bit with some markers and then sprayed the whole thing with acrylic sealer.  Here’s the whole lot drying:

11 holiday cards waiting for the spray to dry

Products used:

  • Rosie’s studio pearlised cards & envelopes in cream (made in Australia)
  • Stamp: Happy Christmas by Fern Gully Stamps (made in Australia)
  • VersaMark Ink
  • Pan Pastels
  • Marvy Twinklette markers
  • Micador workable fixative (made in Australia)

The cards I made for Xmas 2010, Australian family

The basic principles were explained in a Scraptime episode, but the concept is simple: Stamp onto your paper using VersaMark or another watermark ink. Swipe Pan Pastel (here I used Permanent Green) across the image.  Where the Versamark was will show up darker.  NOTE: let the ink dry before swiping with pastels else you will get smears and blurs.  Ask me how I know this 😛 *rolls eyes*  Spray with workable fixative and let dry. Then I coloured in the stars with a red Twinklette marker and the baubles with the silver.  The silver marker turned out a lot darker than I had thought 🙁  I was going to add some stick on rhinestones too but I found out too late that the ones I had bought were not suitable as they had the wrong sort of adhesive.  Oh well!  I then sprayed it all again with fixative just to be safe.

I can’t say that I am thrilled with the way they turned out but I am short on time and hey, they will do the job.  Handmade cards are rare nowadays so I hope they are appreciated.

If you have any questions or comments, please drop me a comment.  I’ll be unavailable Sunday, Dec 5 as I will be flying back to the US via New Zealand, but I will hopefully feel up to being online again on Monday.

What are you making for the hollydaze this year?? 🙂

Soft Hearted (amigurumi)

In my first attempt at amigurumi, I made a little stuffed heart for my niece’s 8th birthday.

A crocheted, stuffed heart
A heart for Olive

I used the Tree Hearts pattern by Linda Cyr for Red Heart (Ravelry link, Free pdf of pattern link). Her original pattern called for a worsted weight yarn but I used a bulky one.  So my heart was just over 5 inches across.  A good size for a snuggle toy for an 8 year old, I think.  I used Shepherd Colour4me Twist yarn, 100% Australian Merino Wool, in The Sick Chick signature colours, of course 😉

I had a bit of a problem on the first half: when I turned around to crochet into the unworked loops on the back of the foundation chain, I managed to get a bit of a hole forming right where I turned around.  I fixed this on the second half by tugging and pulling at the yarn til the hole closed, but on the first side it was too late to fix it.  (Or at least all efforts failed 🙁 ). So I hit upon the idea of the felt hearts!  As you can see my blanket stitching is more suitable for Frankenstein than nice presents but it did the job.  I cheated and just glued on the smaller one.  And it gave me a way to personalize the gift so I thought it was a nice touch and no one but you and me need to know that it was done to cover a problem.  Shhhh! 😉

In all, I think it’s not bad for my first time!  I thought the pattern was very easy to follow, except for that strange hole but even then once I worked out that it was happening I was able to work around it.  I also really liked the yarn.  I was afraid it was going to be scratchy but really it worked up just fine!  Wish I had more, I love seeing my three colours all twisted together like that 🙂