Handmade Holiday Recap, Part 1

I’m sure you’re quite ready to be done with the recent holiday season and that every other blogger has long since posted the things they made for Giftmas 2011. Well sorry, I prefer not to post until the gifts have been received so there is no chance of spoilers. (Which is why this is part 1, as some gifts are late and the recipients are still waiting…oops.)

Do you remember the Handmade Pledge that was so popular about two years ago, maybe three? It was a pledge to only give and request handmade items, with a darling little blog badge favored by those who had made the pledge. I never signed up, never will. Not because I don’t give handmade gifts but because I always *want* craft supplies and books about crafting. I also try to give craft supplies to those on my gift list who appreciate them. Unfortunately, while I believe that is still supporting handmade it doesn’t fit the terms of the pledge and it does still mean money is going to large companies that manufacture their items en mass in foreign countries. (Like books, most of which are printed in China.) I did feel like I was a little bit left out because I didn’t get to wave a banner of indie, handmade pride like those who signed the pledge but since that fad fizzled out I guess they couldn’t really stick to those ideals either.

What I do support is giving handmade items as much as I possibly can, but only things I have made myself. Even if it is just a small fraction of the total package someone receives, it is still meaningful. So on that note, I’ll start showing you some of the things I made this year. Unfortunately, I forgot to photograph the things I made for my in-laws prior to leaving Australia. Today, therefore, is what I made for my mother to send to friends and family as part of the gifts she gave. (I don’t generally exchange gifts with the extended family so these were just little tokens, not intended to be stand-alone gifts.)

First, the cards:

A few Christmas cards with an embossed image of a stylized Christmas tree

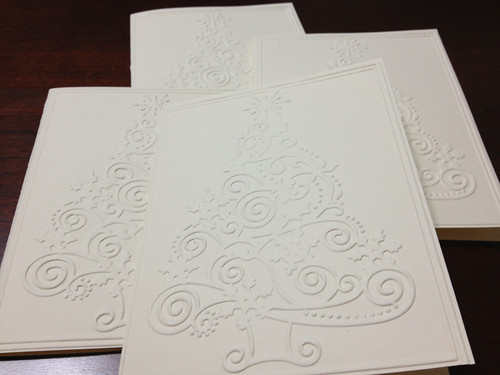
I know they seem a little plain. It is just a Sizzix embossing folder of a Christmas tree (directly embossed on pre made card blanks). Inside is just a simple stamped greeting. My mother wanted neat and elegant so this was exactly as requested, she really liked them. Alas, even with such basic techniques as embossing and stamping, I still managed to mess up quite a few! I need to remember to never stamp when my blood sugar is low because I often get the shakes. Also I am quite a perfectionist so even if things were off by 2 mm I still counted them as imperfect. Two imperfections and they were out! What you see were the ones I deemed entirely unusable.  Still, a handful wrong and 25 good enough is not a bad average for someone very out of practice at card making, if I do say so myself. 🙂

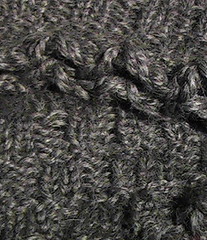
Next, the potholders:

Red and Green woven cotton potholders

Potholders woven in a variety of bright colors

This is a little embarrassing because as most crafty folks know, kids often start making these around the age of 6. One of my cousins even asked why my mother had returned the potholders she had made her over 40 years ago. *rolls eyes* But again, this was my mom’s request and I made them even though I suspected people would not really appreciate them. These potholders hold up better than any other kind and you can’t buy them in stores, they’re only available handmade. She had originally envisaged sending everyone gifts of soup mix in a jar with potholders and spoons to go with them. She later decided against the jar mix part so the potholders I made for her wound up being rather out of context.

If you are familiar with potholders made of loops (the stretchy cotton loops are usually the leftovers from sock manufacturing), you may notice how very vivid these colors are. That’s because these are not the grab bags you can buy at craft stores but are made with Harrisville Designs’ Potholder Loops. In addition to their very saturated and modern colors these loops are guaranteed to fit the standard potholder looms. No more loops that break or simply don’t fit, no waste.

I came up with a system for making potholders where you only have to weave 1/2 of the weft loops rather than the way I learned where you have to weave all of the weft. I suspect there are more ways to improve since I’ve seen these for sale on Etsy for about $5 each and I can’t imagine anyone taking the 35-45 minutes I spend, plus expenses, and then selling them for only $5. Maybe they have found a way to make at least two an hour? Maybe they don’t have to stop and fast forward through commercials on the DVR? 🙂 At any rate, I’ve been thinking of doing a video or a photo tutorial showing my method to cut down on weaving. (It is not where you use a pencil to hold the warp in one position, but it gives the same results.) Would anyone be interested in seeing that? Don’t want to waste my time if weaving potholders with loops is too 20th century or only for under-10s. 😉

I don’t know how the cards were received but the potholders I think had dubious responses.  I suspect they thought it was too primitive an item, that only children made them and adults only own or use them to indulge the child makers. Heh. I’m not really close to the aunts and cousins my mom gave them to so I don’t feel like asking directly. In the future I think I shall only make potholders for people who appreciate them and/or serious cooks without any children in their lives to make them some. 😉

I’ll be back with parts 2 and 3 of my handmade holidays soon, including dyeing, machine embroidery, needle felting and loom knitting.

The Prodigal…returns?

OK, so it’s been nearly six months since I last posted. I could explain, but you’d probably be bored to tears.  Basically it involves poor health on my part and continuing poor health of relatives on my side and t’s side so international trips, etc.  I’ve been very ill and still am, but at least on Tuesday they finally figured out the latest of my diseases and it’s being treated so I should feel a lot better soon as the meds kick in!  

Also this little nuisance has been keeping me from crafting:

Pixiebelle "helps" me loom knit


She’s a bit older than that now (4 months) but still has a yarn fetish and a sixth sense — she can be anywhere in the apartment but the moment I pull out yarn she comes running to investigate!  She’s at the vet right now getting spayed so fingers crossed for her speedy recovery!! I’m keeping her shaved fur to spin, hee hee 🙂

So anyway, since I’ve been gone so long I imagine not many folks are following me anymore, but those of you who are still out there, do you think it would be a bad idea if I moved this blog elsewhere?  I have my own server now with WordPress on it and other blogs I’m setting up there so it would be easier for me to have it all in the same place, but I don’t want to disadvantage my readers too much or lose too much traffic that I’d get from wordpress.com searches.  (And yes I will definitely post the new address here so people can find me later!)

Thoughts? Suggestions?  If no one says anything I’ll take that as a sign that I should move the blog as no one’s watching here anyway 😉

One from the vaults: Scooter Hat

I made this around the end of February but never got around to posting.

 "Scooter" Hat

I call this the Scooter hat because it reminds me of the hair of Scooter from the Muppet Show.  Inspired by the Rasta Hat of Annie Modesitt, I’ve never seen the pattern just the pictures.  Made with Colinette Prism yarn in the Zebra colourway on the Reader’s Digest circle loom.  Fits me snugly so approximately youth sized or very small ladies.

Stencils for beginners

iHanna does some of the most amazing things at her blog, you should seriously check it out!  One of the things she has turned me on to are the myriad of challenges around various crafty sites.  I decided to start the Green Pepper Press Crusades which are monthly challenges in various paper-crafting techniques. April’s challenge was cutting your own stencils.  (I want to note that I did technically do this in April, but the deadline for posting was extended to May 7 so I’m on time anyway 🙂 )

The tutorial Michelle Ward posted on the Crusade site is very good and if you are interested in making your own stencils I suggest you go read it now and come back here later 🙂  I do not have a burner tool so I just had to make do with craft knives.

The first step is to decide what you want your stencil to be.  Michelle noted that it’s handy if you can cut the stencil all in one cut so that you will have both a stencil (piece of plastic with a bit cut out of it) and a mask (cut-out shape that stands on its own).  There are good reasons for wanting both to work together, but this post is going to be too long already so I won’t go into them.

I decided that I wanted to start with a letter “J” (for Juliann, of course!).  I scouted around my large collection of fonts and found very many suitable ones but really wanted to draw my own so I doodled a little and came up with a letter similar to my actual handwriting but with clean lines so it would be a little easier to cut. Then on a whim I also doodled with the letters “tsc” (for “The Sick Chick”) and was surprised when I came up with a design I liked for that, too.

Next, I drew out these designs in a larger size onto the backs of used envelopes.  I ideally want something small enough to use for ATCs but figured that a larger size would be easier for this novice cutter.  (As it turns out I think the J will fit on ATCs but only just.)

[You can click on any image for the full sized version.]

So here are my initial doodles, the larger designs drawn in marker, and more supplies for making stencils:
Designs

Cutting the Stencils and Masks

Next I taped things to the cutting mat to help steady them.  First I taped the paper template, then I taped the plastic down over it.  This helped a little but things were still a bit wobbly and the masking tape didn’t hold stuck through the whole process.  Still it was better than nothing.

Taped Up 2 Taped up, ready to cut

Taking a craft knife (Exacto, scalpel, whatever you have), carefully cut around the outlines *without picking up the knife*. I used a very small mat that I had gotten free from a magazine so I was able to turn the whole thing around any time I needed to change direction which made things a lot easier.  If you do wind up lifting the knife, try to start cutting again as smoothly as possible.  You can always go back and clean up joins later but this is a little hard (and you have to do it on both stencil and mask). Unfortunately, I didn’t think to photograph this stage as visually it was pretty boring and I was too busy trying to keep my knife firmly planted.

Using the Stencils and Masks

I used rubber cement to hold the stencil down as there we lots of little fiddly bits that wouldn’t stay in place just by taping the outside.  You can rub off the rubber cement later after the paint has dried.

 A little help from rubber cement

So  here are a series of me painting the stencils and masks…

Starting to paint Fully covered
Stencil and Mask Starting to paint the mask
Mask fully painted
The other Design Other Design in Paint

The Finished Products

The big reveal Reveal 2

That’s just what they look like solo, I hope to make some art projects soon to incorporate them into.

I have enjoyed my first Crusade with the GPP Street Team and hope to be able to be involved in more projects in the future!
 

Create @ Late

Alas, in this case I don’t have many pictures. I took video last night but I have yet to edit it and that’s pretty far down the priority list at the moment, so you’ll have to wait. Sorry!

Last night, the Museum of London had its monthly late night opening (link may rot) but for this occasion it had a crafty theme.  There were booths of people making felt mustaches, animals out of pipe cleaners and wool, a diorama of London with plasticine sculptures, a sign language music video about London and in the other room the booths of knitting, crocheting and spinning.  You can guess what room I was in!

First I met up with my acquaintance, the lovely Claire from PurlPirate, who was teaching hyperbolic crochet which makes a coral-ish sort of shape.  She gave me several pointers about the second row issue (using a larger hook to cast on, not trying to get “under the v” when stitching into the chain, etc.) so I hope that I will be able to improve when I try it again next week.  She also had quite a crowd of people trying out the hyperbolic forms, including many totally new to crocheting.  Go Claire!  She was also teaching people how to crochet with plastic bags and gave an excellent demo on how to cut them up into jag-less strips.

Next I met Rachael Matthews and Louise of Prick Your Finger  (their blog), a yarn and fiber shop that I am sad to say that I have not yet made it to.  Especially since they are involved in the Walking Stick Cozy competition with Missability (run by Felix).  (As an aside, I am sad that I have not yet been able to make a cozy for any of my walking sticks, I think I need the Knifty Knitter Bloom Loom for that to get the right sized tube and shall get one this summer but alas, too late for the competition which ended yesterday.) Bethnal Green is geographically closer to me than Waterloo (home of I Knit) but it’s harder for me to get to due to the weird nature of the London bus system, and that’s why I have yet to go to Prick Your Finger. 🙁  They were demo’ing spinning and had drop spindles available to play with and a big bag of what I think is Black Welsh Mountain fiber.

I sat there forever and made this bundle of yarn:
Third yarn

Not bad for my third time on a drop spindle, but all the credit goes to the fiber, which was sooo easy to spin and wanted to be spun so fine it was almost scary.  Just in case it was the spindle rather than the fiber I tried a bit of my signature flouro pink roving but it came out crap as always. The moral of the story is that I am not very good with roving but am much better with carded batts, so I need to card my fiber!  I have handcarders but man, I covet a drum carder now.

Black Welsh Mountain is a mountain fiber so it’s very scratchy.  I don’t know that I would use this sort of yarn for much of anything but it was heavenly to spin so I shall endeavor to get to PYF before I leave for the summer to get some more to play with!

Finally, I went to meet some of the lovely ladies of Stitch and Bitch London.  I’d only just signed up for their newsletter about three days ago so I haven’t had a chance to attend their events yet (I couldn’t do their sewing up event on the 30th as I had to rest up to go out on the 1st). But it was very nice to meet people and show off the world of loomknitting.  Photos of me will probably be appearing on their blog in the near future.

I didn’t really have anything to do with the other crafty things,which seemed either aimed at kids or designed for people who aren’t usually crafty to dip their toe into the waters and have a little fun.  I have nothing against that, I just wasn’t in the mood.

Still, it was a very fun evening and many thanks to all of the lovely ladies I met who made it such a great experience!

Tidbits: Tried and not quite true

Some more photos just so I can catch up on the past week.  (I still have several months backlog of photos and events to blog about, but I am at least trying to stay on top of things as they are happen now!)

This week I attempted to crochet:

Baby Crochet

I didn’t get very far, I’m still having difficulty with the second row issue, but I got lots of tips last night (which I shall blog about in a minute) so I think I shall give it a go again this week with hopefully better luck.  Buthey, at least I did get stitches made in a second row!

I also made a partial gauge swatch:

Gauge Swatch

I was supposed to knit a 4 inch swatch but by three inches in I knew that I didn’t want to use this yarn for that project.  I did get gauge though, so I am chuffed about that 😉  I will use this yarn on a felting project, probably a laptop cover.  But it (Debbie Bliss Soho) is just too scratch for a hat and I don’t really want to have to line it.

Also in the photo is my new temporary wedding ring, I think I have blogged about it but not sure :/  (Brain is sooo not what it used to be, thanks fibro!)  My real one doesn’t fit at the moment but as I *have* to lose weight because of the diabetes I didn’t want to get it resized so I got a temporary one from the same place as t’s wedding ring and he is getting one to match (but wearing it on a different finger, it’s been backordered for a while though 🙁 ).  I couldn’t wear rings at all for about five years because my fingers swell a lot during the day but that is lessened now and also I don’t need to use two sticks quite as much, I can make do with one, so that makes it easier to wear a ring on my left hand.  It’s just so nice to have *any* wedding ring 🙂  Plus I can wear this one on a different finger once I do lose the weight.

FO Friday: Project Superstar Bracelets

I mentioned these last week so here are the pix:

Bracelets

The upper bracelets are plastic beads on elastic cord, the lower (for their mom, Valerie) is glass beads mixing the girls’ favourite colours with a silver awareness ribbon charm, strung on 49-strand silver-plated Beadalon.  The colours here aren’t great since I photographed them on my red flannel sheets but you get the idea.

And, because I thought it was amusing, I snapped a pic of how I have been storing them, on an empty dvd spindle (with my alarm-clock watch):

Bead "Display"

FO Friday: Basketweave hat and neckwarmer

I actually finished this last weekend but with photographing, tagging and all that am only just posting today. Hope that still counts for FO Friday ;0

Basketweave Hat and Neckwarmer

I had contemplated sending this in to LKC magazine as a submission but A) it’s pretty basic and more importantly B) it fits me perfectly, which means it will be too small for most adults with hair.  I didn’t want people to get disappointed.

So here it is instead!  I had two skeins of Debbie Bliss Alpaca Silk in Aran weight (I still think Alpaca smells of dog when wet but oh well, it’s sooo nice to knit with!) that I had gotten half off at the John Lewis after Christmas sales in Newcastle.  It had gotten lost in my stash for a while until I was looking for something to go with my Harley jacket (the jacket you always see me in in photos where I am in the chair) which has charcoal grey lettering on the back.  So I pulled this out  hoping to make something in time for the Paris trip and I might have succeeded if I hadn’t frogged the first three attempts.  The yarn’s softness was lost in a detailed stitch pattern (frog #1) but I found I wanted a pretty edging rather than purely functional (frog #2) and eventually (after frog #3) settled  on a basketweave border with plain stockinette for the rest.

Detail of Basketweave hat and neckwarmer

I used the Reader’s Digest loom and used a little bit tighter tension for the borders as I want a little bit of “grip” like you would otherwise get from ribbing.  I did five rows of k2p2 ribbing, then five rows of p2k2 and then five more k2p2.  Then knit as long as I wanted (28 rows in this case) and do the border again for the neck or closed up for the hat.

The neckwarmer looks insanely long but it actually pulls up over my mouth, nose and the bottom of my ears.  The hat comes down to meet it around my ears and thus is forms a pseudo-balaclava but a little more dainty and of course they can be worn separately and the neckwarmer can be scrunched down when it’s not so cold.  (I have problems in very cold weather with my lungs due to my asthma and doctors have suggested that I breathe through a scarf to help pre-warm the air before it hits the lungs.  It does seem to help.)  I also wanted something that could go under the collar of my jacket so that when it zips up I have a layer protecting me from wind — my biggest complaint with that jacket is that the neckline is a little too big. (My second biggest complaint is that if I am wearing a sweater under it it looks like I have scary uniboob happening around my waist, soooo unflattering, especially as it flattens the actual boobs so they don’t show and I get this weird look instead :/  But I have yet to find a knitted solution to that!)  So this has fit both bills 🙂

I have to say that I LOVE this yarn.  It handled the frogging pretty well and I think it will bloom a little when washed, but right now the stitch definition is excellent. It feels a little softer when sliding through your fingers while working with it than in the finished garment, but the end product is still really nice.  WEBS has this for half price (I think it was just under US$5 for a 50g ball) so I got four skeins in an eggplant colour and I hope to do a cabled scarf to go with my burgundy coats (maybe a hat if there is enough left!).  I totally recommend it. 

Oh and for the record the neckwarmer took a little over one skein and the hat a little under, but again that’s because I made the neckpiece longer than most anyone else would want it.

I’m also proud that it looks needle-knit rather than loom-knit.  The flat knit stitch (Isela’s way) really makes sooooo much difference to the finished project that I have switched to it exclusively.


I was on Knitting 911

Oh yeah, I simply must mention this!  I was one of the guests on the latest episode (4) of Knitting 911, the loom and needle knitting podcast by Denise Layman of KnitChat.com and Loom Knitter’s Circle Magazine fame.  You can listen on the webpage.

This has gotten me fired up to resume my own long-neglected podcasting and I will be posting more about my plans soon.

Lagoon legwarmer

Lagoon Legwarmer

I had started this thinking it would be a thing-a-day but the blasted thing took me twelve hours over two days.   Knowing that has put me off doing its mate until thing-a-day is over.

Anyway, the gory details: One legwarmer, extra-long (I like em to come up over my knees), made in K2P2 (2×2) ribbing on the green loom that came with the Reader’s Digest set (does this thing have a real name?).  Made from one skein of Colinette Prism in the Lagoon colourway, to be worn with the Ponytail hat.  With lots and lots of flaws where I purled instead of knitting and vice versa.  Doing ribbing for a few rows isn’t so bad, but for over two feet is a lot harder than I thought!  But I guess part of knitting, especially when something is meant as a utility garment rather than stylish one, is that you have to learn to live with the mistakes.  Still, I think I have a lot more love for storebought legwarmers after this.  (And the ones I shall be making for friends will be ribbed at both ends but e-wrapped in the middle!!!)